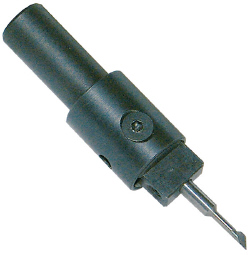


Instruction for workflow
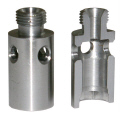
There are 2 methods to deburr a bore.1. with spring force.
It's very simple and is sufficient in most cases.2. with rigid setting.
This allows you to create defined chamfers and also remove larger burrs as by threaded bores.In both cases, you have to assemble the tool in respect to the bore diameter and to adjust the range limit that the drill hole edge meets the front slope of the blade in the middle. This is done with the upper set screw.
| Configuration table | ||
|---|---|---|
| Bore | Insert | Blade |
| 0,8 - 1,0 | E00 | S08 |
| 1,0 - 1,2 | E00 | S10 |
| 1,2 - 1,5 | E00 | S12 |
| 1,5 - 2,0 | E00 | S15 |
| 2,0 - 2,5 | E00 | S20 |
| 2,5 - 3,5 | E05 | S23 |
| 3,5 - 4,5 | E10 | S23 |
| 4,5 - 5,5 | E15 | S23 |
| 5,5 - 6,5 | E20 | S23 |
| 6,5 - 7,5 | E25 | S23 |
1. With spring
Drive with fast gear just before the hole.Drive in the drilled hole with rotating tool and with great feed, about F500, until the blade is through the hole and the blade stock lies tight by the hole. The front edge of the blade is blunt, to let the blade dive in easily and to protect the outer chamfer. As soon as the blade head is through the hole, drive back with low feed. Thereby the burr will be removed.
Then drive out of the hole very fast.
The deburring intensity depends first of all on the used spring force, but also on the rotation speed and the feed speed.
2. With rigid setting
The spring is removed and replaced by the enclosed M3 screw, so you now have 2 adjusting screws. The range of the reach limit is now precisely adjusted and fixed with the 2 screws. The programming is somewhat more complicated than the sprung variant. The spindle or the workpiece must be displaced in the Z direction so that the cutting edge can travel through the bore without contact.Now Drive through the hole without rotation and with great feed.
Then displace the spindel or the workpiece back. Now turn on the rotation and go slowly uppwards until the desired chamfer is reached.
Then turn off the rotation and do the displacement once more, to enable the blade come back to the start position without contact. Now drive out of the hole.